Wednesday, January 28, 2009

CSA: Community Supported Agriculture

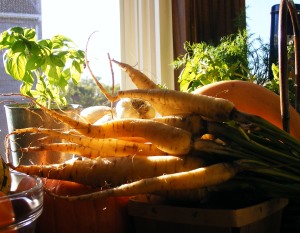
baby-yellow-carrots

Last week I came home absolutely giddy because I had finally taken the plunge and signed onto the CSA program. Perplexed by my announcement, my boyfriend thought I was admitting to be a secessionist. Not quite. In the 21st century “CSA” more commonly refers to Community Supported Agriculture, and can basically be described as a network that connects consumers (of food) with the local farming community (take that Jefferson Davis!)

The way most CSA programs work involves “shareholders” or “subscribers” buying into a crop before the growing season begins. In return for the investment, consumers are supplied with a share of fruit and vegetables that the farm produces, which is chosen by the farmers based on which crops have ripened. Depending on the farm, they often deliver to neighborhood businesses, institutions, or even established subscribers’ homes. Shares of different sizes and intervals are available. For instance, from the church two blocks from my apartment, I will be receiving a share every other week, (as I only need enough for two people), over a 20-week span. Usually the growing season begins in June and lasts through September, sometimes with extensions into Fall and Winter. CSA involves more than produce farmers, but also meat and poultry, eggs and cheese, even nuts and flowers.

The value of establishing grower/consumer relationships through networks like CSA is enormous and beneficial to both parties. You can know exactly what you are eating, where it is from, and the conditions in which it was grown. Local food tastes better as it is more fresh and seasonable, with no need for long-term storage and over-packaging. Pollution is reduced by food traveling minimal distances, and farmland remains farmland, resisting needless urban and suburban sprawl. A step up from frequenting farmers’ markets, the grower is paid in advance, and energy is focused on food over fundraising.

I wanted to sign up last year but did not think I could afford it and was wary of moving apartments and being without a kitchen. So this is the year when I can test all the good things I’ve read—the only complaint I’ve come across is that there are too many vegetables, and you have to get creative cooking things you may not know about.

One of the struggles I never foresaw about urban living is the loss I often feel in not being a part of a tight-knit community. Growing up my world was small, as I’m sure it was for everyone, but it always felt like the people around me were there for a reason, that we all shared something much greater than proximity. I didn’t know what an advantage I had being raised within walking distance of Fairview Gardens, which remains today one of the finest small-scale urban food sites. Knowing now that my summer meals will be based on fresh food that came from southern Wisconsin and benefited a wonderful and underappreciated part of the community, for me, will be the best damn part of the summer

Wednesday, January 21, 2009

President Obama Bison Burgers

Overwhelmed by information and updates from the inauguration yesterday, I decided to turn my attention to dinner preparations as an outlet, a way to channel the media-frenzied energy that was beginning to make me feel listless and patriotically chaffed. Off my mind wandered to thoughts of Red, White and Barry Parfaits or a Barry Obama Pie, or perhaps an Onion Obama Frittata. It was about seven seconds later I realized that all of these possibilities were down-right obnoxious, crossing the line to overkill, and that I needed to regroup and plant my feet on solid ground.

Something simple, hearty, with just a dash of national pride was required. I recalled seeing a recipe for bison in a food magazine recently and thought there could be nothing better suited than burgers for a celebration of our 44th President. Having recently read about the benefits of bison in lieu of beef, it was a topic I felt compelled to research more thoroughly.

The nutritional benefits make a strong case for integrating bison, or American Buffalo (even though it isn’t technically buffalo), into your diet. Whereas beef cattle are often injected with hormones and drugs, and are subjected to over-handling, bison deliver quality meat with no intervention. It is substantially lower in fat and calories than lean beef, while providing more protein, iron and B-12 to your system. But if you, like the rest of us, are not into calorie-counting, the environmental impact of bison versus beef cattle may be more resonant.

While grass-fed beef is now widely available, cattle still require grain to supplement their diet, the cultivation of which eats up prairie land and emits enormous amounts of fossil fuels from crop processing machinery. Most of the environmental benefits of bison can be attributed to the fact that they are non-domesticated and therefore require as little human influence as possible. Prairies and grass pastures naturally provide a sustainable food source, simultaneously reducing soil erosion, and allowing other species a habitat in which to thrive.

There is a downside to bison (though it took me a while to uncover), which is that they are very temperamental and sometimes dangerous, which is exactly why indigenous populations never domesticated them. I came across a statistic that claimed you are about 4 times more likely to be injured or killed by bison than bears. Though, if you provoke a bison, which is the only reason they would attack, you deserve what’s coming to you.

In closing, bison are rad and look prehistoric so stop eating cows, you terrorists, and get your fix with the true American beast.

To the recipe!

  • a few glugs of olive oil
  • 2 onions (sweet or yellow), sliced
  • 1/2 cup dry red wine
  • 1 pound ground bison (you can buy it at Whole Foods and it’s the same price as their ground beef)
  • 2 shallots, chopped
  • 1 clove of garlic, minced
  • large pinches of salt and pepper
  • a few splashes or Worcestershire sauce
  • 4 hamburger buns
  • enough white cheddar (or provolone or pepperjack) for the burgers, and snacking while you prepare the burgers
  • Dijon or stone ground mustard
  • a few handfuls of whatever greens you have on hand (spinach, arugula, romaine)

Sauté onions with a bit of oil and salt over medium heat until golden brown, turning to prevent out-right burning, and lowering heat if necessary. Add the wine and reduce until the liquid is absorbed, set aside.

If you have one, fire up the broiler which will come in handy for bun toasting and thawing the interior of your kitchen. Combine the meat with the shallots, garlic, S&P and Worcestershire. I made four patties with the pound of meat, but they were a bit scrawny so three may be better. Heat a well-oiled skillet on high and cook until well-browned (about 2 minutes per side will be med-rare.)

Cover the bun-tops with cheese and broil both tops and bottoms for a few seconds until toasted (turning your back to the oven will inevitably turn them to charcoal briquettes, as I well know). For easy assembly, spread mustard on the bottoms, top that with greens, then the bison, and finally the cheesy bun-top.

(See Bon Appétit for a similar, yet less refined recipe.)

Thursday, January 15, 2009

Lamb Kebobs for Winter Blues

Chicago is approaching 26-year record lows, and has already topped out its snow average for the year. Lining the streets are discarded papers that read “60 Hours Below Zero” and “Brace Yourself”. As a California transplant, hearing news like this can drive me into an unforgiving pit of despair. All of a sudden I’m pulling out my hair and smacking my forehead against the frosted-over train platform screaming expletives as I curse that fateful day I decided to move. These hopeless winter moments are further agitated by messages left from loved ones who are enjoying record highs with their barbecues and short-sleeves and stupid walks on the beach.

One must have an arsenal of tools and activities to combat the winter blues. My trenches are outfitted with new kitchen instruments, recipes, challenging ingredients, and many bottles of wine. A common defense on a January night takes the form of stew or roast, but like anything else, these too lose their appeal after weeks of repetition.

A fresh approach occurred to me that instead of concocting a warm dish, I could create a dish that originated in a warm place. Turning to inspiration from the Middle East and the frozen pound of ground lamb I had on hand, all the elements fell into place for spicy lamb kebabs. (this recipe is an adaptation from Jamie Oliver)

1 lbs. ground lamb (you can get neck or shoulder and have it ground by the butcher)
1 tsp. dried thyme
1 tsp. cumin
1 tsp. ground red pepper (chili)
1 large lemon (zest and juice)
pinch of salt and pepper
handful of shelled pistachios
1 red onion, peeled, half thinly sliced, half finely chopped
couple handfuls of romaine and/or arugula, shredded
small bunch of mint
small bunch flat-leaf parsley, leaves picked
4 large tortillas (flat bread or pita would be more authentic)
small container of Greek yogurt

Serves 4.

If you have access to a barbecue and the temperature isn’t 11 degrees, these kebabs would be ideal on the grill. That being said, when your lovely barbecue is piled with 6 inches of snow and frozen shut it is necessary to find alternative means. A griddle pan or a good old large sauté on the burner will do the trick.

Also if you are working with wooden skewers be sure to soak them for 30 minutes before use, or if you have neither, just work the lamb into little patties and cook through.

Combine the spices and lemon zest (hold the juice) and set aside a few pinches to dust the final wraps. In a food processor or with sufficient elbow grease combine the lamb, spices and zest, large pinches of salt and pepper, pistachios, and the chopped onion until well mixed.

Divide the meat into fourths, and mold each piece around a skewer, like corn-on-the-cob, maintaining an equal thickness (no thicker than two inches) so the meat cooks evenly. Set aside.

Mix the lettuces, parsley and mint leaves with the sliced red onions, and squeeze the juice of one lemon to cover. Toss these with salt and pepper, and set aside as the acid will slightly pickle the onion taking the bite out of them.

Get the barbecue or pan hot and cook your skewers about two minutes on each side until golden brown all over (cut through to make sure they are evenly cooked). While the lamb is cooking, warm or toast the tortillas. Dress the tortilla with salad leaves, break pieces of lamb off the skewers, dollop with yogurt, sprinkle on the reserved spice mixture and enjoy!
(And tell Clarice the lambs stopped crying.)

I didn’t have my camera on hand while cooking, so this is taken from my lunch left-overs today (not a great photo but tasted delicious.)


Thursday, January 1, 2009

New Year's Stuffed Mushrooms

Alas, I have returned. Smarmy politics and the bitter cold wind off the lake once again blew my desires for a vegetable bed and wee chickens to raise and slaughter back to the dreamworld in which they reside.

While visiting that California dreamworld I was asked to bring food to a New Year’s Eve party with, you guessed it, a load of vegans. Not one for preparing faux-meat, I turned elsewhere and came across a recipe for stuffed mushrooms which resulted in a noble nibbly veg.

I enjoy a lot of versatility in food especially when it comes to appetizers, which I often find myself needing to whip up last minute. The beauty of the mushroom is that you can take its stuffing down the road of breadcrumbs, orzo, ground meat, or in this case roasted and briny vegetables.


2 med. red bell peppers, roasted
1 long red chile pepper, roasted
1/2 cup green olives, finely diced
2 shallots, finely diced
2 cloves garlic, minced
1 tbs. olive oil + 1 tbs. reserved
salt and pepper to taste
1/2 cup Pecorino Romano and/or Gruyere, grated (omit for vegans)
about 15 Cremini mushrooms
bunch of parsley for garnish

Preheat the oven to 400F degrees

To roast the bell and chile peppers, puncture all over, then with tongs or a long fork hold over an open flame (e.g. your burner) until thoroughly charred and blistered. Place both peppers in a bowl and cover tightly for about ten minutes, until they steam their own insides and the skin peels easily off. Remove seeds as they can be hot or bitter depending on the size of the pepper.

Finely dice the capsicums and add them to the diced olives, shallots, and garlic. Toss together with oil, salt and pepper to taste, and cheese. Pop the stems out of clean mushrooms and fill the cavities generously with stuffing. Place the mushrooms on a cookie sheet lined with foil and in the oven they go! Bake for about 20 minutes until the mushrooms are golden and the cheese is melted.

Sprinkle the tops with parsley and enjoy!